This tutorial is a guide for the use of layers in coat creation, in order to be able to complete this tutorial your graphics program must be able to do layers.
The reason why I do this in layers is because it keeps my base clean, and it is easier to go back and fix something should you find a piece of shading or what not - not to your liking afterwards.
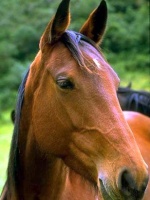
For starters, as always, pick your base - for this tutorial I will be using a base I created:

I want you to colour the hooves black - yep, just paint them right on the base but always make sure you save the file as something other than what your base is called - in case you need to start over.

Next, make a new layer - there are a couple of ways to accomplish this, but I generally just copy and paste something as a new layer then erase it (don't ask me why I do it this way - I just like to).
Now the first thing you're going to do is pick your colours, you're going to need a base coat colour, a highlighting colour, and at least one shadow colour - though for this tutorial I will be using four shadow colours (Please ignore the grey scale shading next to the brown - it's for something else, also, my highlight colour is over at the top of the grey scale shading - barely visible). You may place them on this layer if you wish. Now, tracing the basecoat beneath, colour in the entirety of it in the base coat colour (with the exception of the hooves).

As you can see, it doesn't exactly have to be exact.. but the closer the better generally.
Please choose your point of reference for your lighting at this time, it's important for the shading process. For this tutorial, the lighting will be hitting the horse head-on.
Now, add another layer on top of the layer you just coloured, and taking your lightest SHADOW colour add some detail to it such as muscle ripples, and other lightly shaded areas.

Please make another layer at this time, and taking your second shadow colour, add some more shading - this time to the parts of the horse that are generally darker than the rest, such as underchin, underbelly, buttocks, nostril, joint curves, and accent shadows to the tail and mane:

Add another layer, and with your third shadow colour add some shading accents and definition, this is generally on the same areas as before, only to a lesser degree - also if you play with the transparencies of the brushes then you can create the basic effect I created on the neck here:

Add a new layer. With your final and darkest shadow colour, add the remaining shadowing (don't forget the eyes!) to the rump, back of legs, tail, mane and underbelly.

Now we are going to add the highlights, take your highlight colour (which should be a lighter shade of your base coat colour) and add highlight to face, chest area, and foreleg areas.

At this point (and please, make sure you are saving it along the way in a format that will allow you to keep your layers intact) review your work so far, you may want to tweak some of the layers just to make everything flow better.
Now, save your work.
Before we do anything else, I want you to select your "base" and erase wherever it sticks out of your image (this should be easy if you keep the other layers visible) except for the hooves).
Check over your image again to make sure that there are no voids that now need to be filled in.
Save again
I want you to combine, or merge ALL the layers down to the background layer so that you have one flat image.
Now we start to do the finishing work, using your effects tools - find the smudge brush:

Smudge all the points where the layers over lap like so (please excuse the blending effects going on at the head - I accidentally save over part of this file with the next step):

Now using the blend effects tool:

Blend over those areas we just smudged (I use the "blend a lot" function, you can use whatever varient you like so long as you are blending quite thoroughly). Please refer to the face and stomach part of the "smudge" horse image for reference
And now we are going to use the smear brush,

To smear out the "zebra lines" that we may have left over from the smudging and blending process. You may or may not have them depending on how well you smudged, and blended. Here's an example of Zebra Lines:

we work these out using small linear up and down motions along the line, or small circular motions along the line. Once you have taken the majority of them out, you can blend again if you like.
Now that we have rid our horse of it's zebra heritage, it's time to do the detail on the mane and tail. Let's start with the tail. Using the smear brush we are going to work up and down the tail in sections making a zig-zap pattern which we over lap until we reach the desired look. The same method is used on the mane, however instead of an up and down motion, you go which ever way the mane is directed.

You're almost done, all that's left is the fine detailing and clean up. You can do the detailing however you desire. Just make sure you erase any blurry edges around the horse, and erase the colour palette (if you placed it on the first layer like in this tutorial) since you will no longer need it.
Here is my "finished" product (really I might go back and do more to it, but for the tutorial purposes it's done):

Always remember to save, save, save!
The reason why I do this in layers is because it keeps my base clean, and it is easier to go back and fix something should you find a piece of shading or what not - not to your liking afterwards.
For starters, as always, pick your base - for this tutorial I will be using a base I created:
I want you to colour the hooves black - yep, just paint them right on the base but always make sure you save the file as something other than what your base is called - in case you need to start over.
Next, make a new layer - there are a couple of ways to accomplish this, but I generally just copy and paste something as a new layer then erase it (don't ask me why I do it this way - I just like to).
Now the first thing you're going to do is pick your colours, you're going to need a base coat colour, a highlighting colour, and at least one shadow colour - though for this tutorial I will be using four shadow colours (Please ignore the grey scale shading next to the brown - it's for something else, also, my highlight colour is over at the top of the grey scale shading - barely visible). You may place them on this layer if you wish. Now, tracing the basecoat beneath, colour in the entirety of it in the base coat colour (with the exception of the hooves).
As you can see, it doesn't exactly have to be exact.. but the closer the better generally.
Please choose your point of reference for your lighting at this time, it's important for the shading process. For this tutorial, the lighting will be hitting the horse head-on.
Now, add another layer on top of the layer you just coloured, and taking your lightest SHADOW colour add some detail to it such as muscle ripples, and other lightly shaded areas.
Please make another layer at this time, and taking your second shadow colour, add some more shading - this time to the parts of the horse that are generally darker than the rest, such as underchin, underbelly, buttocks, nostril, joint curves, and accent shadows to the tail and mane:
Add another layer, and with your third shadow colour add some shading accents and definition, this is generally on the same areas as before, only to a lesser degree - also if you play with the transparencies of the brushes then you can create the basic effect I created on the neck here:
Add a new layer. With your final and darkest shadow colour, add the remaining shadowing (don't forget the eyes!) to the rump, back of legs, tail, mane and underbelly.
Now we are going to add the highlights, take your highlight colour (which should be a lighter shade of your base coat colour) and add highlight to face, chest area, and foreleg areas.
At this point (and please, make sure you are saving it along the way in a format that will allow you to keep your layers intact) review your work so far, you may want to tweak some of the layers just to make everything flow better.
Now, save your work.
Before we do anything else, I want you to select your "base" and erase wherever it sticks out of your image (this should be easy if you keep the other layers visible) except for the hooves).
Check over your image again to make sure that there are no voids that now need to be filled in.
Save again
I want you to combine, or merge ALL the layers down to the background layer so that you have one flat image.
Now we start to do the finishing work, using your effects tools - find the smudge brush:
Smudge all the points where the layers over lap like so (please excuse the blending effects going on at the head - I accidentally save over part of this file with the next step):
Now using the blend effects tool:
Blend over those areas we just smudged (I use the "blend a lot" function, you can use whatever varient you like so long as you are blending quite thoroughly). Please refer to the face and stomach part of the "smudge" horse image for reference
And now we are going to use the smear brush,
To smear out the "zebra lines" that we may have left over from the smudging and blending process. You may or may not have them depending on how well you smudged, and blended. Here's an example of Zebra Lines:
we work these out using small linear up and down motions along the line, or small circular motions along the line. Once you have taken the majority of them out, you can blend again if you like.
Now that we have rid our horse of it's zebra heritage, it's time to do the detail on the mane and tail. Let's start with the tail. Using the smear brush we are going to work up and down the tail in sections making a zig-zap pattern which we over lap until we reach the desired look. The same method is used on the mane, however instead of an up and down motion, you go which ever way the mane is directed.
You're almost done, all that's left is the fine detailing and clean up. You can do the detailing however you desire. Just make sure you erase any blurry edges around the horse, and erase the colour palette (if you placed it on the first layer like in this tutorial) since you will no longer need it.
Here is my "finished" product (really I might go back and do more to it, but for the tutorial purposes it's done):
Always remember to save, save, save!
Last edited by on Thu Oct 04, 2007 1:24 am; edited 1 time in total